Multimer
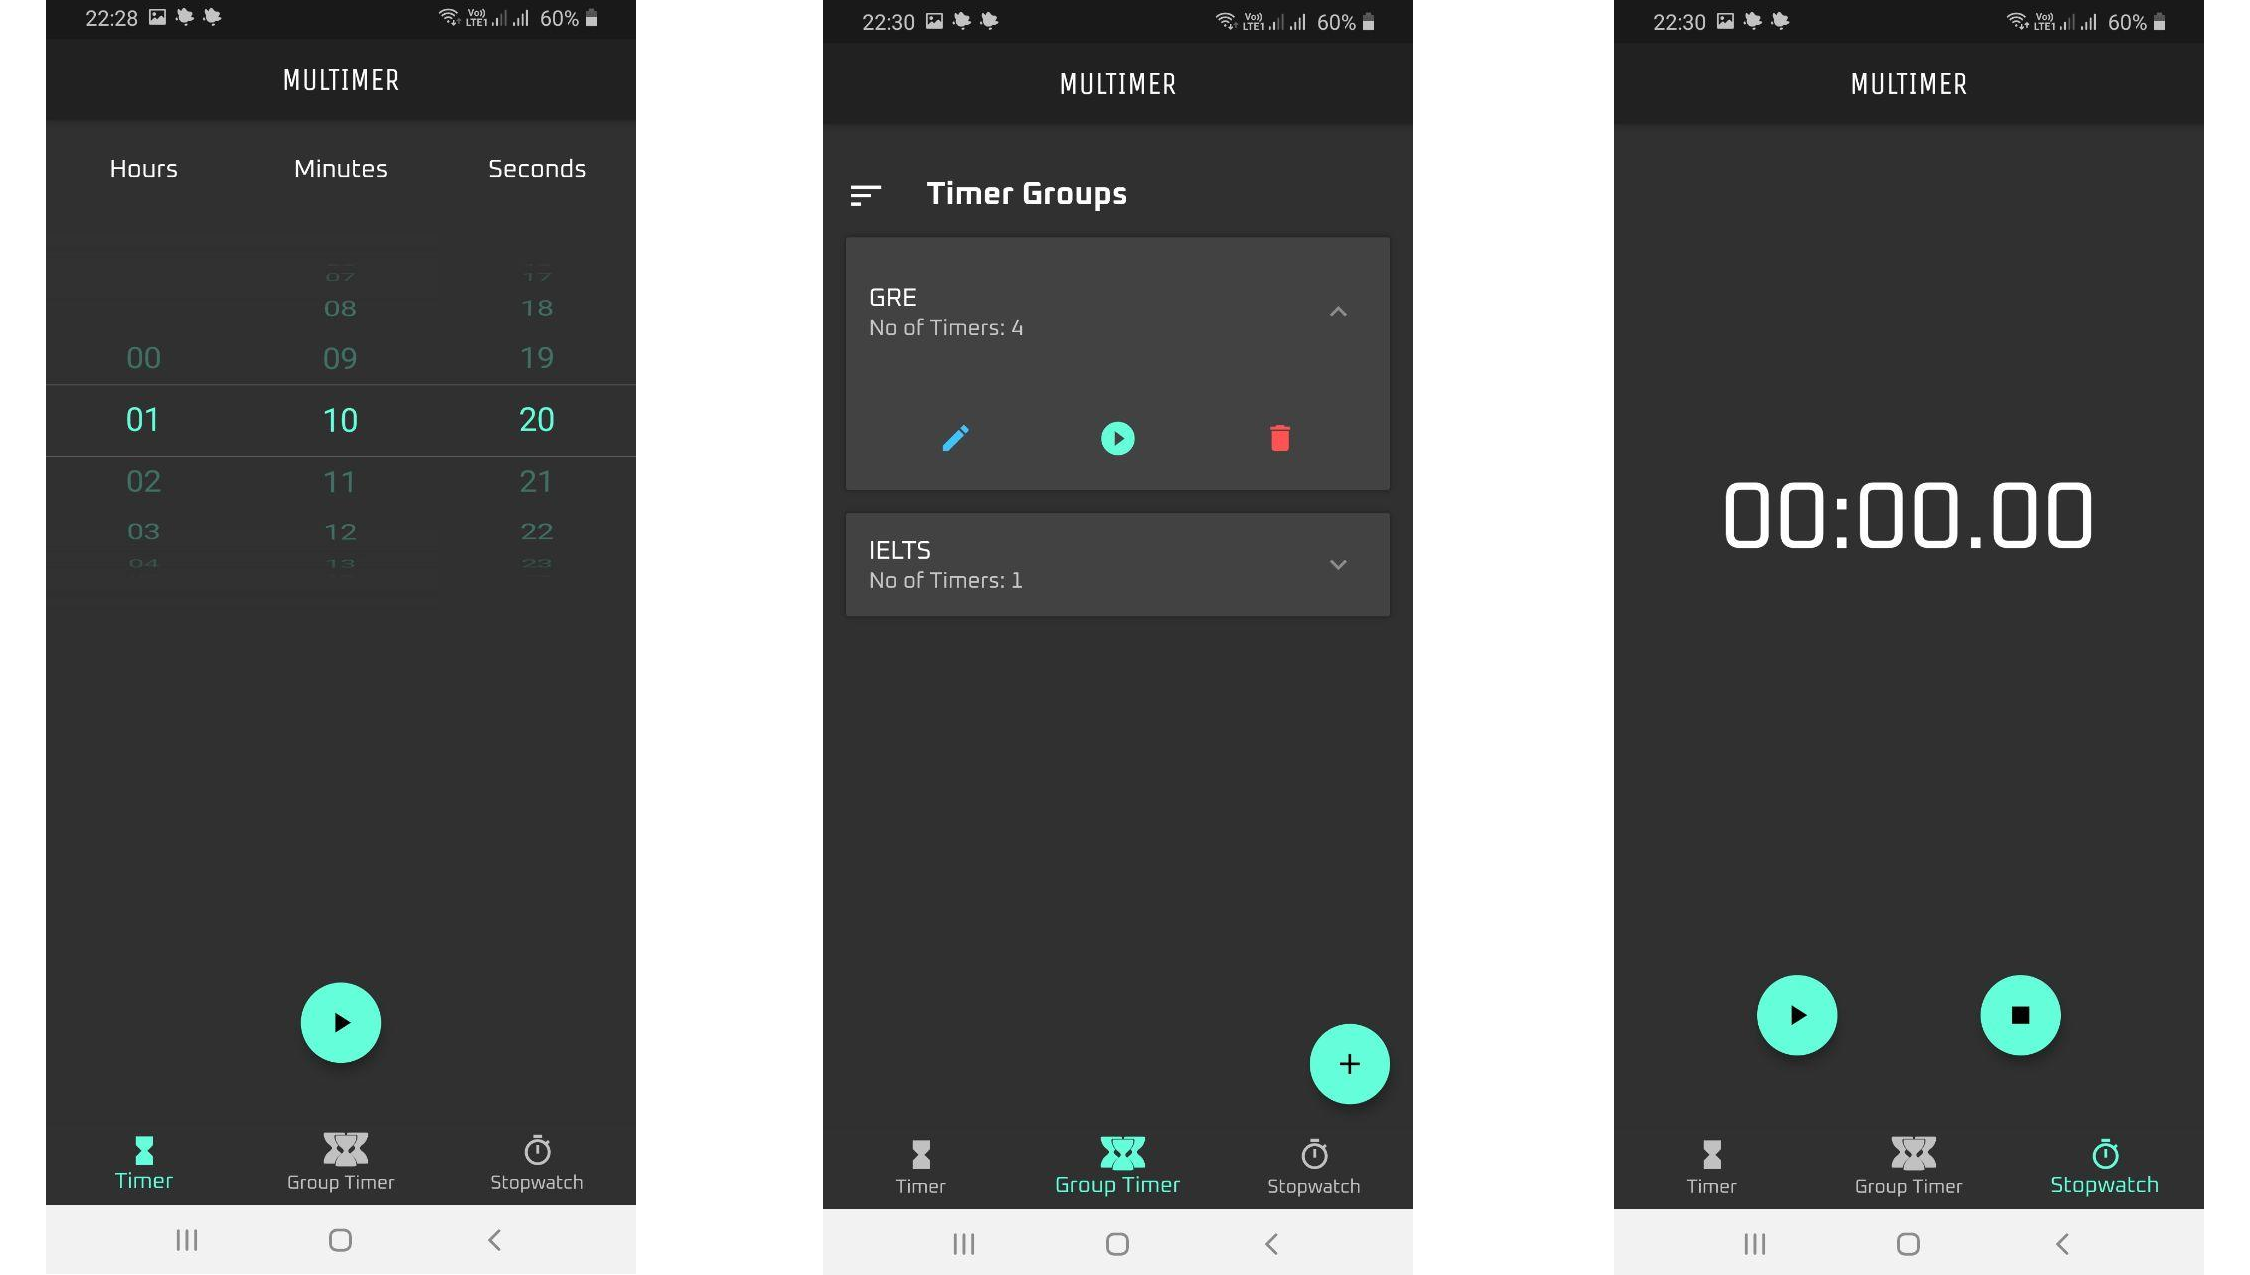
Multimer is a typical timer + stopwatch app, with one extra feature of being able to set multiple timers that can execute sequentially. It was named Multimer because initially I only wanted to build an app that can run timers one after the other, but later on added normal timer and stopwatch as well.The idea was mostly because I wanted to be able to practice for my GRE test by setting timers, just like an actual exam. (Though that didnt happen, I completed the app, almost a month after my GRE test 😁)
I have before tried to do android apps using Java, but found it to be plenty difficult without spending a considerable amount of time learning lot of things before hand, even though I'm web developer who uses Java day in day out. After hearing about Flutter, wanted to try it out and see how this would go. Even though it had its weird moments (for a rookie) it has a much lower barrier for entry. This being my first app I was more concerned about getting it to work than making it right. So there will be lot of bad design choices and also wrong usage of flutter itself.
App structure
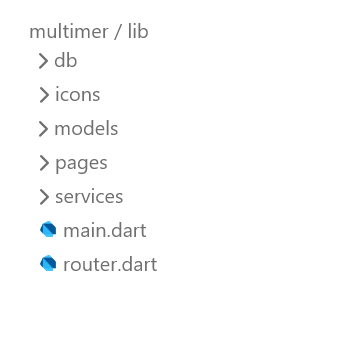
- db - Has all the files directly talking to database which involve all CRUD operations as well helper to initiate DB connection.
- icons - For using custom made icon directly as flutter icon.
- models - Reflects the tables present in DB, but has some logic associated to each entity',
- pages - Contains the different screens and visual components. Any screen having dynamic/multiple displays is a folder itself.
- services - Has helper functions to call DB methods and then use that data for UI components
- router.dart - Has the logic for opening different screens based on user interaction (routing mechanism)
Routing Mechanism
There are multiple ways for routing in Flutter. But influenced by django and React, I went with the option of a dynamic route, defined in a separate file - routes.dart. This is useful because we can pass data from different screens while building the screen and separating routing logic makes the application a bit cleaner. To do this we just need to pass a method which returns a Route object to the OnGenerateRoute property of MaterialApp.
void main() async {
    WidgetsFlutterBinding.ensureInitialized();
    await SystemChrome.setPreferredOrientations([DeviceOrientation.portraitUp]);
    runApp(MaterialApp(
        theme: ThemeData(fontFamily: 'Oxanium', brightness: Brightness.dark),
        initialRoute: '/',
        onGenerateRoute: Router.generateRoute,
    ));
}
And then write a switch case in the method to return correct page based on the name of the route. The name will be available as part of settings argument which is populated by the Navigator when a particular page does named push. One thing to note is we cannot return a Widget directly but a Route object consisting of a builder object having the particular Widget for that route path.
static Route<dynamic> generateRoute(RouteSettings settings) {
    Map<String, dynamic> data = settings.arguments ?? {};
    switch (settings.name) {
        case INITIAL_ROUTE:
            return getLoadingScreen();
            break;
        case HOME_ROUTE:
            return getHomeScreen();
            break;
        case NEW_ROUTE:
            bool isUpdate = data.containsKey('isUpdate') ? data['isUpdate'] : false;
            MultiTimer multiTimer = data.containsKey('multiTimer') ? data['multiTimer'] : null;
            return MaterialPageRoute(builder: (_) => AddMultiTimer(isUpdate, multiTimer));
            break;
        case PLAY_ROUTE:
            return MaterialPageRoute(builder: (_) => PlayMultiTimer(data['multiTimer']));
            break;
        default:
            return MaterialPageRoute(
                builder: (_) => Scaffold(
                        body: Center(child: Text('No route defined for \${settings.name}')),
                    ));
    }
}
Any arguments needed for a particular view are passed in the Navigator and are also available as part of settings arguments. These are checked whether they exist and the passed accordingly to the widget.
Database Management
All operations related to Database are handled by 3 files under the lib/db folder
db_helper.dart
This file handles creation of database file, the relevant tables and initiation of database connection.
The creation of database is done by getting the apps internal storage path and using sqflite libraries functions to create a SQLite library. If there is no database already present, the 'onCreate' callback is executed, which will create the relevant tables.
// open the database
_initDatabase() async {
    // The path_provider plugin gets the right directory for Android or iOS.
    Directory documentsDirectory = await getApplicationDocumentsDirectory();
    String path = join(documentsDirectory.path, _databaseName);
    // Open the database. Can also add an onUpdate callback parameter.
    print('Initiating database');
    return await openDatabase(path,
        version: _databaseVersion,
        onConfigure: _onConfigure,
        onCreate: _onCreate);
}
And in order to ensure a single connection to database, first a lock is created so that any race around that happens before the database is initiated, will not result in 2 database initiation calls. And also, once the database is initialised the same database is returned whenever the getter database is accessed.
// Only allow a single open connection to the database.
static Database _database;
Future<Database> get database async {

    if(_database == null){
        await _lock.synchronized(() async {
            if(_database == null) {
                print('Initiating new DB instance');
                _database = await _initDatabase();
            }
        });
    }

    return _database;
}
timer_db.dart & multitimer_db.dart
These 2 files provide all the necessary low level CRUD operations for Timer and Multitimer tables. It also provides some functions to get related objects.
For eg. the list of timers present in a particular multitimer. And it also converts the map object obtained from database to appropriate class objects (Timer and Multitimer objects).
These files are implemented as singletons since there's no need for the app to get separate instances whenever its being used.
Data models
There are 2 model files - reflecting 2 tables in the database. One for Timer and one for Multitimer. Each of these model classes define all the columns of its corresponding table as fields. It also has some helper methods for doing operations on the data object. Both the Timer and the Multitimer class also provides methods to convert a map to the corresponding object and vice versa.
Two patterns I have used commonly to convert from database map response to object and vice versa are:
Timer.fromMap(Map<String, dynamic> map){
    id = map[columnId];
    hours = map[columnHours];
    minutes = map[columnMinutes];
    seconds = map[columnSeconds];
    multitimer = map[columnMultiTimer];
    displayOrder = map[columnDisplayOrder];
}
Map<String, dynamic> toMap() {
    var map = <String, dynamic>{
      columnHours: hours,
      columnMinutes: minutes,
      columnSeconds: seconds,
    };
    if (id != null){
      map[columnId] = id;
    }
    if (multitimer != null){
      map[columnMultiTimer] = multitimer;
    }
    if (displayOrder != null){
      map[columnDisplayOrder] = displayOrder;
    }
    return map;
}
Service
Service (multitimer_service.dart) is a single service that provides high-level methods for creating, retrieving, and deleting multitimers. It also handles the addition of individual timers to the multitimer. This file inturn uses the DB helper classes to execute any action. And as the 'service' tag implies this is used as a singleton.
View
All the code related to view and its associated logic is present under the folder lib/pages.
This contains
This contains
- loading.dart - The view used for all loading screens
- add_multitimer.dart - The view used to show the screen where a new multitimer can be created.
- home - This is a folder having multiple nested screens. This contains 3 screens and also the widget for the navigation bar. One of the 3 screens is shown when a corresponding button on the navigation bar is pressed.
- Single Timer screen (single_timer.dart) - This has the widget tree for showing a time picker, buttons for starting, pausing, and stopping the timer. Once the time is picked, and the start button is pressed, the time picker widget gets replaced by the circular progress bar widget. It also handles producing a sound when the timer reaches its time limit.
- Multitimer screen (group_timer.dart) - This has the widget tree that shows the list of all saved multitimers. When a particular multitimer is pressed, it expands to show 3 buttons - Edit, Play, and Delete. The Edit button will open the same screen as add_multitimer but with details pre-populated. The Play button will open the screen showing a circular progress bar. And Delete will open a confirmation dialog asking to delete.
- Stopwatch screen (stop_watch.dart) - This I directly copy-pasted from bizz84/stopwatch-flutter 😊 (with the copyright notice, of course), as it was the exact same thing I wanted. His article was really great, so check it out.
- play_multi_timer - This contains the widget and logic to draw the circular progress bar and also to make it show the 'progress' according to time.
- Timer widget (timer_progress.dart) - This file contains code to draw a single circle with radius, stroke-width, and color being passed as arguments and a an arc over it with circumferance according to the progress value. It extends the flutters CustomPainter to implement 'paint' and 'shouldRepaint' methods. The 'paint' method does the actual drawing on to the canvas object passed to it, using the 'drawArc' method. The 'shouldRepaint' method tells when it has to be redrawn. In this case, it's only true when the progress value has changed or the widget itself has changed.
void paint(Canvas canvas, Size size) {

Offset center = Offset(size.width/2, size.height/2);
double radius = min(size.width*radiusFraction,size.height*radiusFraction);

Paint paint = new Paint()
    ..strokeCap = StrokeCap.square
    ..strokeWidth = thickness
    ..color = backgroundColor
    ..style = PaintingStyle.stroke;

canvas.drawCircle(center, radius, paint);

paint
..color = color
..strokeWidth = thickness + 2.0;

canvas.drawArc(Rect.fromCircle(center: center, radius: radius), -pi/2,
    animation.value * 2 * pi, false, paint);
}
- MultiTimer widget (play_multitimer.dart) - This file contains the code to draw the dual progress bars and control the animation. The outer progress bar indicates the total progress and the inner progress bar indicates the progress of each timer. It also builds a textual time display showing how much time has passed in each timer. And also 2 buttons to control playing, pausing, and stopping the timers. A status listener (a callback that listens to the status change of an AnimationController) is added to the Outer progress bar controller. This is to show the appropriate display of the progress bar when the status changes either because the timer completes or because the stop or pause button is pressed. If it stops or is finished the value of progress is reset to 0.
addStatusListener(){
outerProgressController.addStatusListener((status) {
    switch (status){
    case AnimationStatus.completed:
        timerIndex += 1;
        _stopAlarm();
        if (timerIndex < widget.multiTimer.timers.length){
        outerProgressController.duration = Duration(
            seconds: widget.multiTimer.timers[timerIndex].getTotalSeconds()
        );
        outerProgressController.value = 0;
        outerProgressController.forward(from: 0);
        } else {
        timerIndex = 0;
        outerProgressController.duration = Duration(
            seconds: widget.multiTimer.timers[timerIndex].getTotalSeconds()
        );
        }
        break;
    case AnimationStatus.dismissed:
        if (animationStopped){
        timerIndex = 0;
        animationStopped = false;
        outerProgressController.duration = Duration(
            seconds: widget.multiTimer.timers[timerIndex].getTotalSeconds()
        );
        }
        break;
    default:
        break;
    }
});
}
A tick listener (a callback that listens to every tick/unit progress of an animation controller) is also added to the outer progress bar controller, to know when it's about to reach the end of the timer's time limit and start the alarm sound. And in case it has moved on to the next time, then to stop a ringing alarm.
addTickListener() {
outerProgressController.addListener(() {
    Duration currentTimer = outerProgressController.duration *
    (1 - (outerProgressController.value));
    if (currentTimer.inSeconds < 10){
    _startAlarm();
    } else if(currentTimer.inSeconds < 1 && alarmStarted){
    _stopAlarm();
    }
});
}